Eight weeks ago we were set the task of creating a group multi-track project of a cover of our choice; my group chose to record a cover of Fleetwood Mac’s ‘Don’t Stop’. The production process included pre-production, demo recording, arranging musicians, musical arrangement, engineering and the production of a monitor mix. As a group we worked really well together, there was a good array of talents both musically and technically. Due to the nature of the task, everyone had a change to play an instrument and take the role of either technical setup, desk operator or ProTools operator.
For this track I played the lead guitar parts that were recorded in week five of the recording process. This meant that I had plenty of time to try out the other roles within the studio. I found it really helpful to try each one, this meant that I could get a hands on experience of setting up the studio (Instrument placement, Microphone placement, Sound proofing/deflection) as well as operating the desk (Getting an input into the desk, Setting levels, Sending a signal to ProTools) and operating ProTools (Creating tracks/group tracks, Organising tracks/files, Editing clips, Playlists).
Being able to have practical experience in the studio has been really helpful to apply the theory knowledge of sound (Reverb, Proximity effect, Frequency response, Phasing). Vocals in week four was a particularly useful learning experience as we got to compare the sound of different vocal microphones looking at how and why they differ in sound.
Our theory and ProTools tutorials lead up to us creating our own mix. Going into the task I felt that I had learnt enough so far to create a professional sounding track. When creating the track i was using my notes from sessions to include all of the aspects we had covered in the tutorials (Clip organisation, Inserts and sends, Auxiliary tracks, Automation, Volume control).
Listening back to the final track I am pleased with the results. There are a few parts I would have liked to re-record or do other take but due to timing this was not possible. Next time i would like to experiment with multiple vocal parts as our track has the one lead vocal track and I think it would sound better if we had backing vocals to fill in the mix.
This week I have been working on mixing our track, a cover of Fleetwood Mac’s ‘Don’t Stop’. Below is a log of everything I did when mixing the track.
Drums
Kick – Gate used to removed the spill from the snare drum and cymbals. 7-Band EQ: 4dB Boost 100Hz and below to boost the low end with a 3dB cut around 400Hz to reduce the boxiness.
Snare Top – Gate used to remove the spill from hi hat and cymbals. 7-Band EQ: 3dB cut around 400Hz to reduce the boxiness and removing a ‘boing’ sound around 500Hz.
Snare Bottom – Gate used for the snare top copied onto snare bottom. 7-Band EQ: 3dB cut around 400Hz to reduce the boxiness and a 3dB cut around 3kHz to remove some of the higher snare rattle.
Rack Tom – Gate used to remove the spill from the cymbals. 7-Band EQ: High Pass filter at 100 Hz, 3dB cut around 400Hz to reduce the boxiness and a boost around 3kHz to accentuate the voicing of the tom.
Floor Tom – Gate used for the rack tom copied onto floor tom. 7-Band EQ parameters used for the rack tom copied onto floor tom.
Overhead Left – 7-Band EQ: High pass filter at 100 Hz to remove any low end spill from the kit, 3dB cut around 400Hz and a 3dB boost to 10KHz and above to accentuate the cymbals.
Overhead Right – 7-Band EQ parameters used for the overhead left copied onto overhead right.
Room Mic – 7-Band EQ parameters used for the overheads copied onto room mic.
Panning – Kick drum and snare in the centre, overheads panned hard left and right, rack tom 1/3 left floor tom 1/3 right room mic in the centre used to bring the kit sounds together.
Reverb Aux Track – Reverb auxiliary track created for the drums (Snare top and bottom, rack and floor tom). Medium Plate reverb with 1.2 second decay.
Guitars
Bass Guitar – Compression used to reduce the dynamic range of the bass sound, remove some of unwanted line sounds. 7-Band EQ: 4dB boost to 100Hz and below to boost the low end, 3dB cut around 400Hz, remove ringing frequency around 3KHz and a 3dB boost 8KHz and above to add clarity to notes.
Bass Guitar DI – Compression used to reduce the dynamic range of the bass sound. 7-Band EQ parameters used for bass guitar copied onto bass guitar DI but with no boost at 8KHz and above.
Acoustic Guitar 1 DI – 7-Band EQ: 4dB boost 250Hz and below to add more low end with a 3dB cut around 400Hz to add clarity to the sound.
Acoustic Guitar 2 – Compression used to reduce the dynamic range of the acoustic guitar sound, remove some unwanted noise. 7-Band EQ parameters used for acoustic guitar 1 copied onto acoustic guitar 2.
Acoustic Guitar 2 Room Mic – Compression used to reduce the dynamic range of the acoustic guitar sound, remove some unwanted noise. 7-Band EQ parameters used for acoustic guitar 1 copied onto acoustic guitar 2.
Lead Guitar – 7-Band EQ: High Pass filter at 250Hz to remove some of the lower end. Slap-back Delay added with 500ms delay to create an interesting sound within the mix.
Lead Guitar Room Mic – 7-Band EQ parameters used for lead guitar copied onto lead guitar room mic. Slap-back Delay settings used for lead guitar copied onto lead guitar room mic.
Panning – Bass guitar in the centre, guitar 1 hard right, guitar 2 hard left, 2 lead guitar signals 1/4 left and 1/4 right.
Reverb Aux Track – Reverb auxiliary track created for the guitars. Medium Ambient reverb with 650ms decay.
Other Instruments
Piano – Corrected mistakes by creating a 2 bar looped section and inserted where needed. 7-Band EQ: High Pass filter at 250Hz to remove low end. 3db cut around 400Hz. 4dB boost at 5.5KHz to increase clarity in the mix.
Synth strings – Duplicated Mono track and panned each one left and right creating a wider stereo feel. 7-Band EQ: 6dB boost at 4.25KHz and above to increase clarity and make it sit well in the mix.
Harp – Compression used to reduce the dynamic range of the harp. 7-Band EQ: High pass filter at 200Hz to reduce the low end resonance and a 3dB cut around 350Hz.
Vocals
Lead Vocals – Compression used to reduce the dynamic range of the vocals, for this I used one of the compressor presets in ProTools – ‘Vocal Leveller’. This reduced the loud parts of the vocal track and boosted the softer parts, to compensate for the gain reduction I used the make up gain to bring the track up to a desired level. 7-Band EQ: High Pass filter at 250Hz, 3dB cut around 300Hz and a 3dB boost at 3KHz to increase the clarity of the female vocals. Reverb added as an insert – for this I used a small plate reverb with a 200ms decay.
Final Corrections
– Listen back to the track to make sure I was happy with each instrument sound.
– Adjust instrument levels to create a balanced mix.
– Use automation to adjust the levels of instruments when the lead guitar is playing and during the instrumental parts.
– Tidy up the track (Cut down the long sustained ending and added small fade in/outs to parts so there arrival in the mix isn’t abrupt)
– Exported the track as a .MP3 file.
– Compared the track with a second track. For this I used Nina Nesbit’s cover of the same song ‘Don’t Stop’, this was not to make that track sound the same as hers but to compare the mix as we were using a similar instrument arrangement as her version.
– Listen to the track through different speakers (Desktop monitors, small speakers and headphones) listening to it quietly, loud and at normal listing volume.
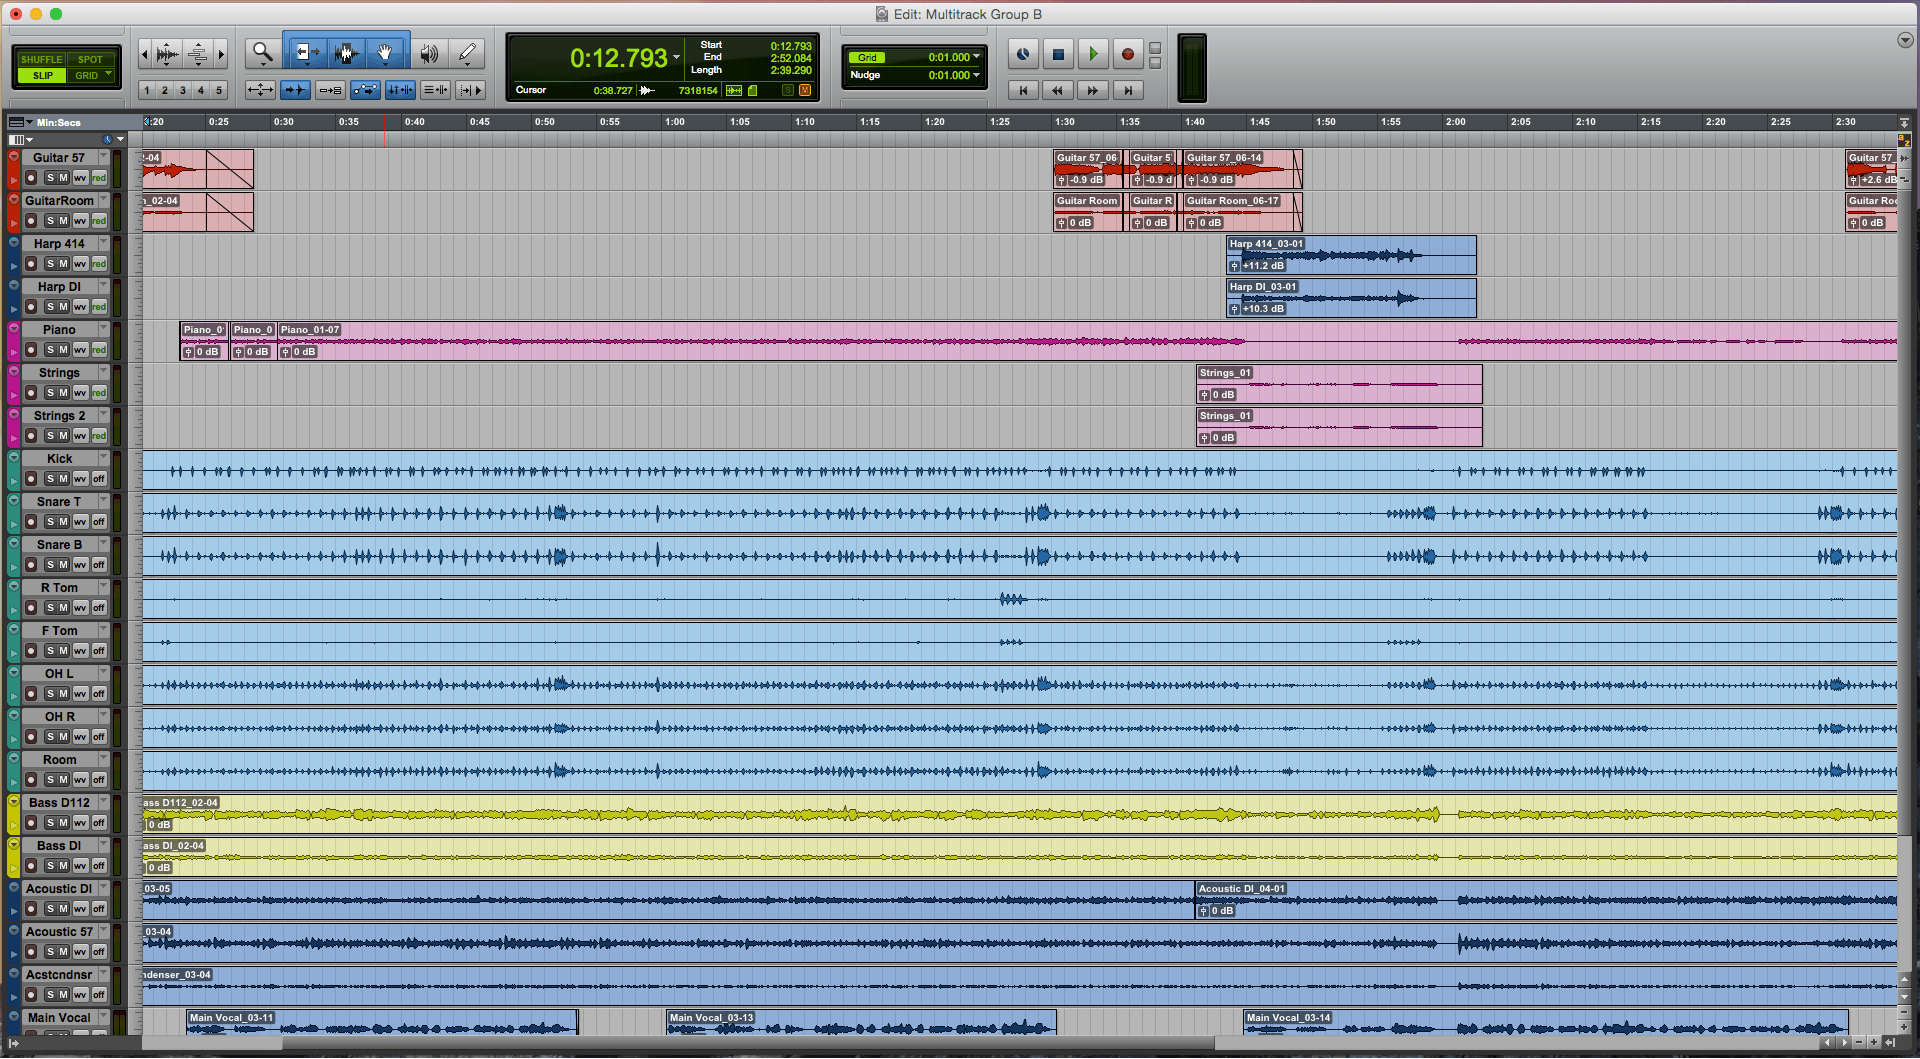
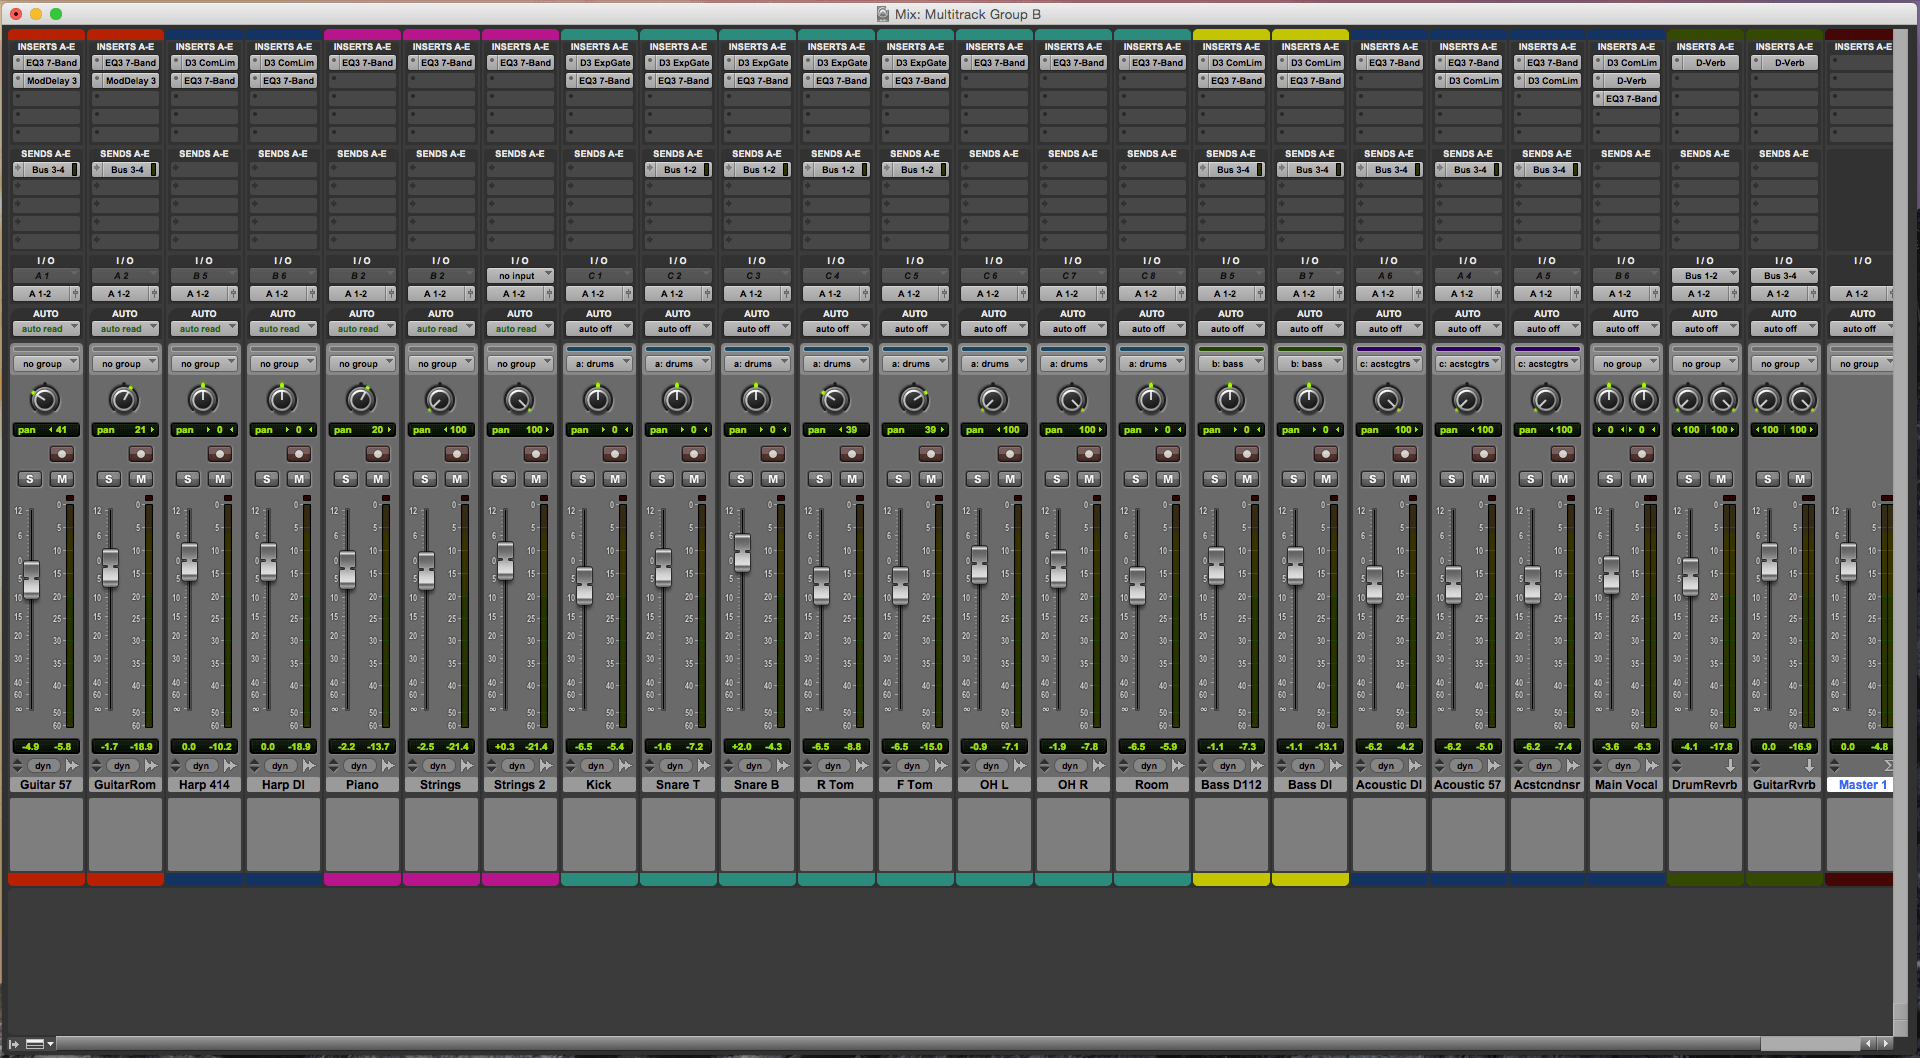
Edit window showing the arrangement of tracksMix window showing the Inserts and Sends of each track
Before we could start working on our final mix we had to prepare the track so we had something to work from. We started by setting all the outputs to master fader A1/2 – we did this as recoding on the desk meant we used a 24 I/O set up. After that we looked at what audio we had recorded and removed any unwanted takes and cropped the clips to exactly what we wanted to include in the mix.
Next we looked at creating a rough mix as a guide to work with. To do this we started by panning tracks as to where we wanted them in the mix starting with the drums (Over heads far left and right, rack tom to the left and floor tom to the right) then spreading out the other instruments to create a greater stereo field. (An acoustic guitar to the left and to the right, the piano being moved left and the harp to the right). Once we had them where where we wanted them in the mix we listened to the track to get an idea of levels. Once we listened through we set the levels to give us a rough idea of how we want them to sound in the mix (Acoustic guitars lower in the mix with the lead guitar higher, vocals on top). Once the levels were set we created group tracks, this allowed us to increase the level of multiple tracks with one fader; this is particularly helpful with the drum track. Group tracks were used of for the drums, bass guitar and acoustic guitars. Finally we had a track that was ready to be mixed.
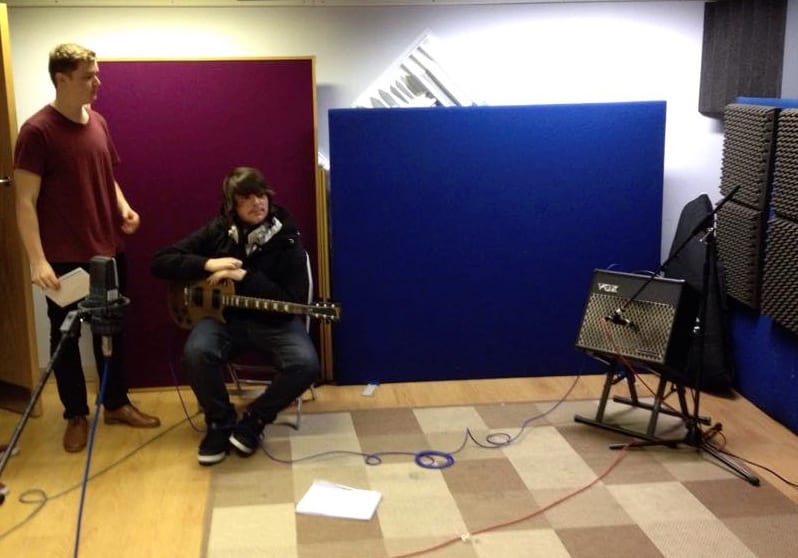
Having finished the main part of the song, we started to look at adding in extra instruments to the mix. Firstly, we recorded a lead guitar part (Intro riff and solo) in the live room. For this we used a Shure SM57 in front of a VOX Valvetronix combo amplifier as well as an AKG C414 set to an omnidirectional polar pattern as a room microphone. The blend of the two inputs offered a clear and punchy sound from the SM57 as well as an added natural room reverberation from the C414 to the room mic.
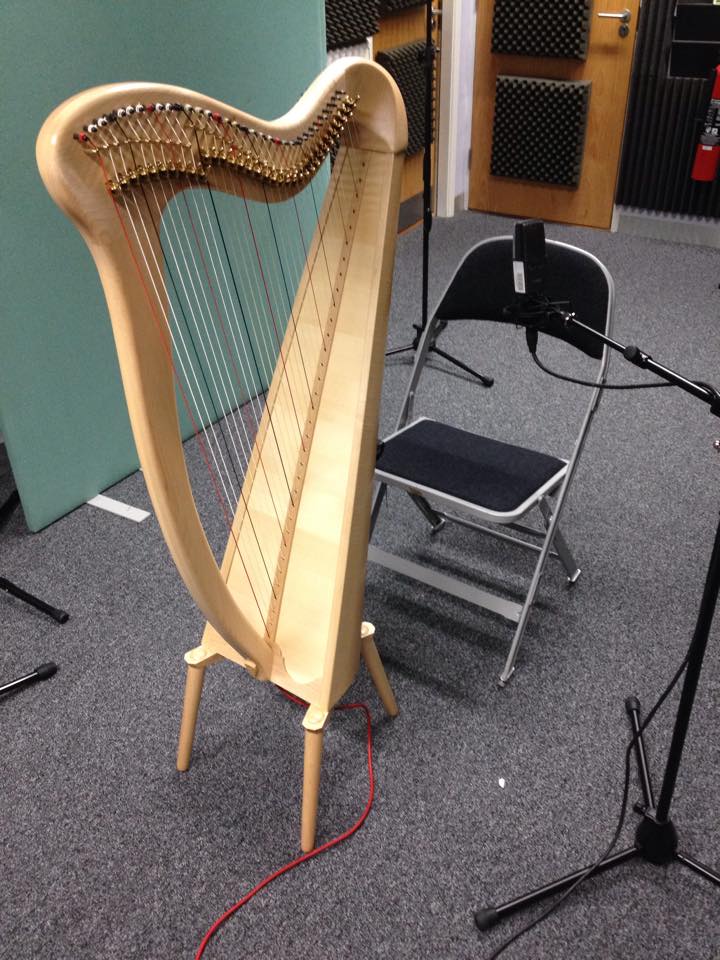
We also recorded a harp part in the dead room to be used for the instrumental chorus. To record the harp we used an AKG C414 set to a cardioid polar pattern placed 15cm away from the strings in upper third of the harp (the area in which the notes would be played). The harp it’s self had a small piezo pickup mounted in the soundbox, this allowed us to take a DI signal straight from the harp to the desk. The microphone signal offered a more whole sound with more low end and the DI signal added a clarity to the notes as they were plucked.
Finally we recorded a piano part, which was recorded using the DI Out on the piano straight into the desk. This made recording the piano part very easy as we just had the single signal into the desk. The piano had changeable voices so we decided to use the ‘strings’ voice and record a string part to add to the track.
Ch. 2 – Electric Guitar: AKG C414 (Used as a room mic)
Ch. 10 – Piano: DI Out
Ch. 13 – Harp: AKG C414 (Positioned infront of the strings)
Ch. 14 – Harp: DI signal from the piezo pickup into the DI rack
Recording Guitar – Shure SM57 on the amp and an AKG C414 as a room micRecording Harp – DI from the piezo pickup and an AKG C414 in front of the strings
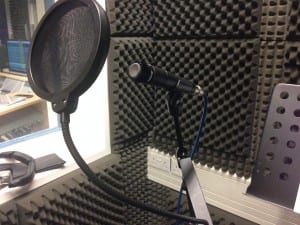
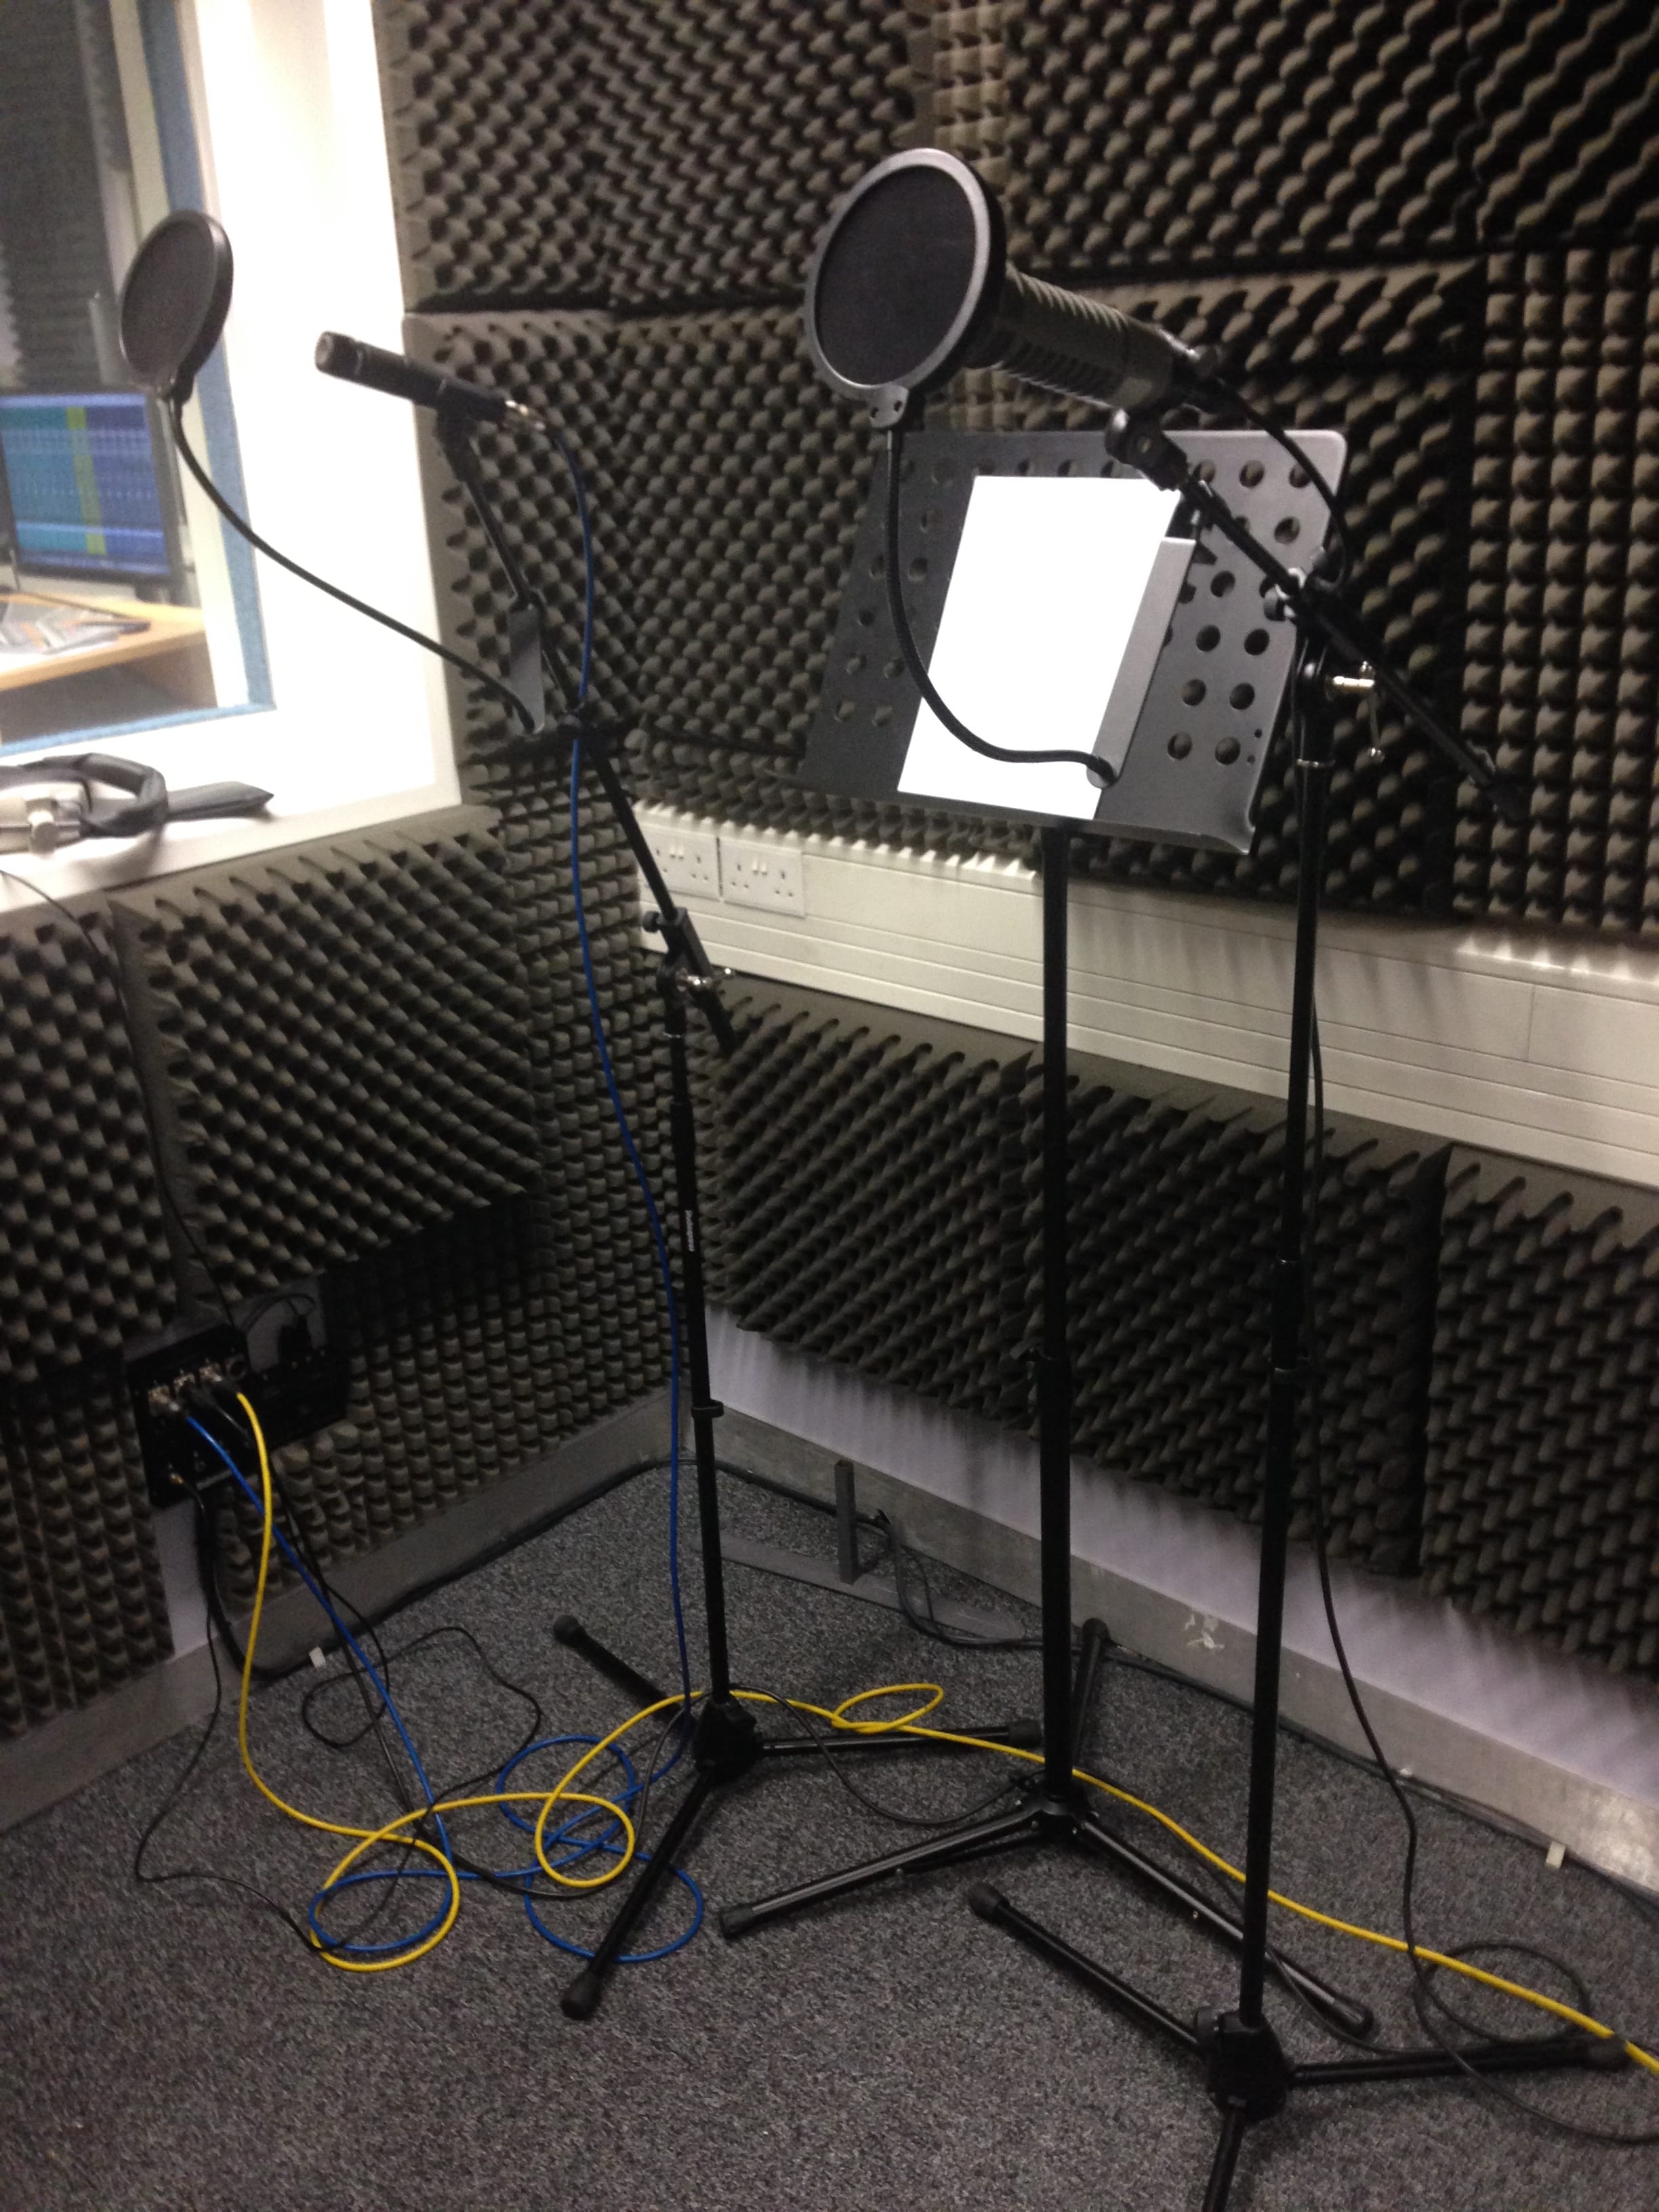
This week we worked on the vocal part for our track. When recording vocals, microphone selection is crucial as certain microphones work better with different vocal styles than others. For this reason we selected three microphones to compare to see which gave us the best sound. The three microphones were set up on individual stands with a pop shield placed in front of each. Having set up the headphone mix in the dead room we got the vocalist to sing in each microphone and from the monitor mix in the control room we judged each microphones sound. The three microphones we used were…
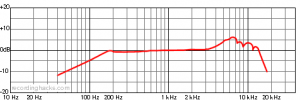
Shure SM57 – A versatile dynamic microphone with a cardioid polar patter; ideal for snare drums, guiar cabs and for vocals. Boosted frequency response around 6/7KHz ideal for vocals. Strong proximity effect when the vocalist is close to the mic.
Frequency Response Chart – Shure SM57
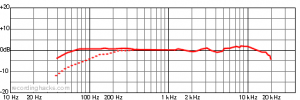
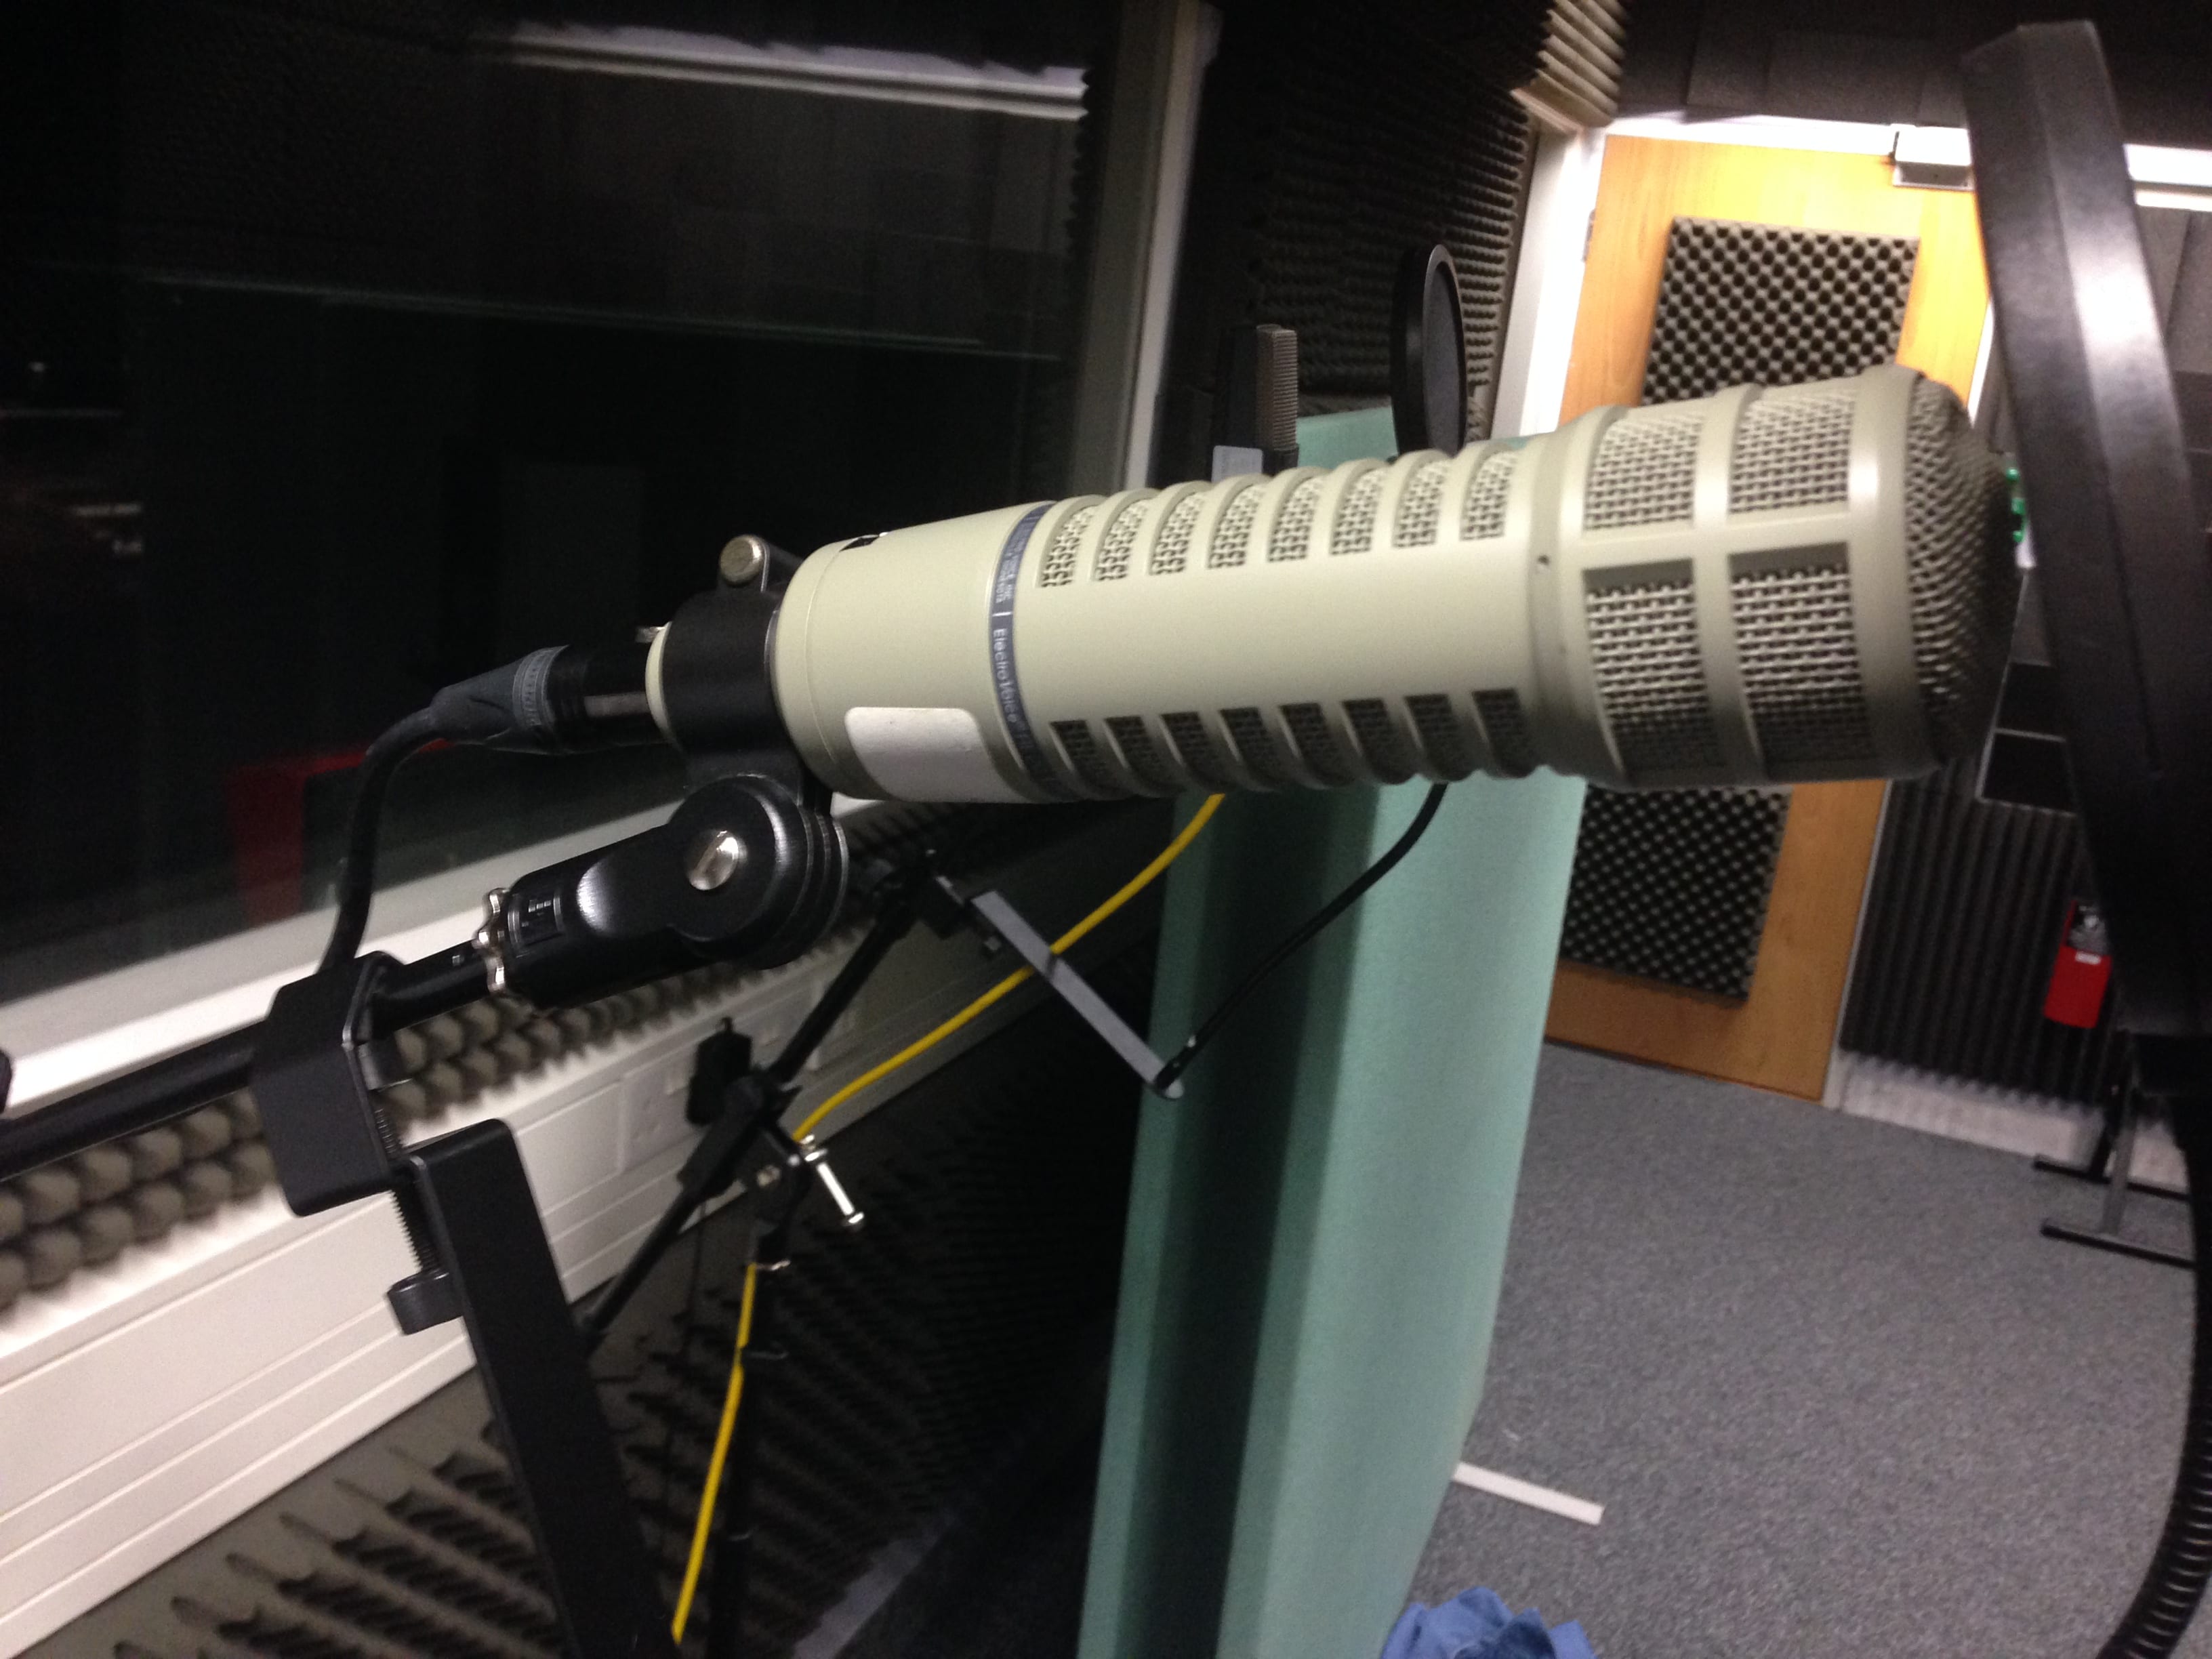
Electro-Voice RE20 – A large diaphragm dynamic microphone with a cardioid polar pattern, usually used as a broadcast mic or on a kick drum. Relatively flat frequency response. Little proximity effect. Optional High Pass Filter switch (-2.25dB/oct at 400Hz).
Frequency Response Chart – EV RE20
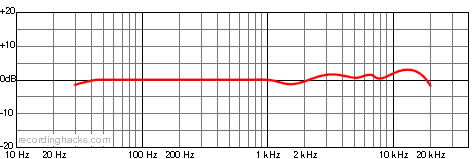
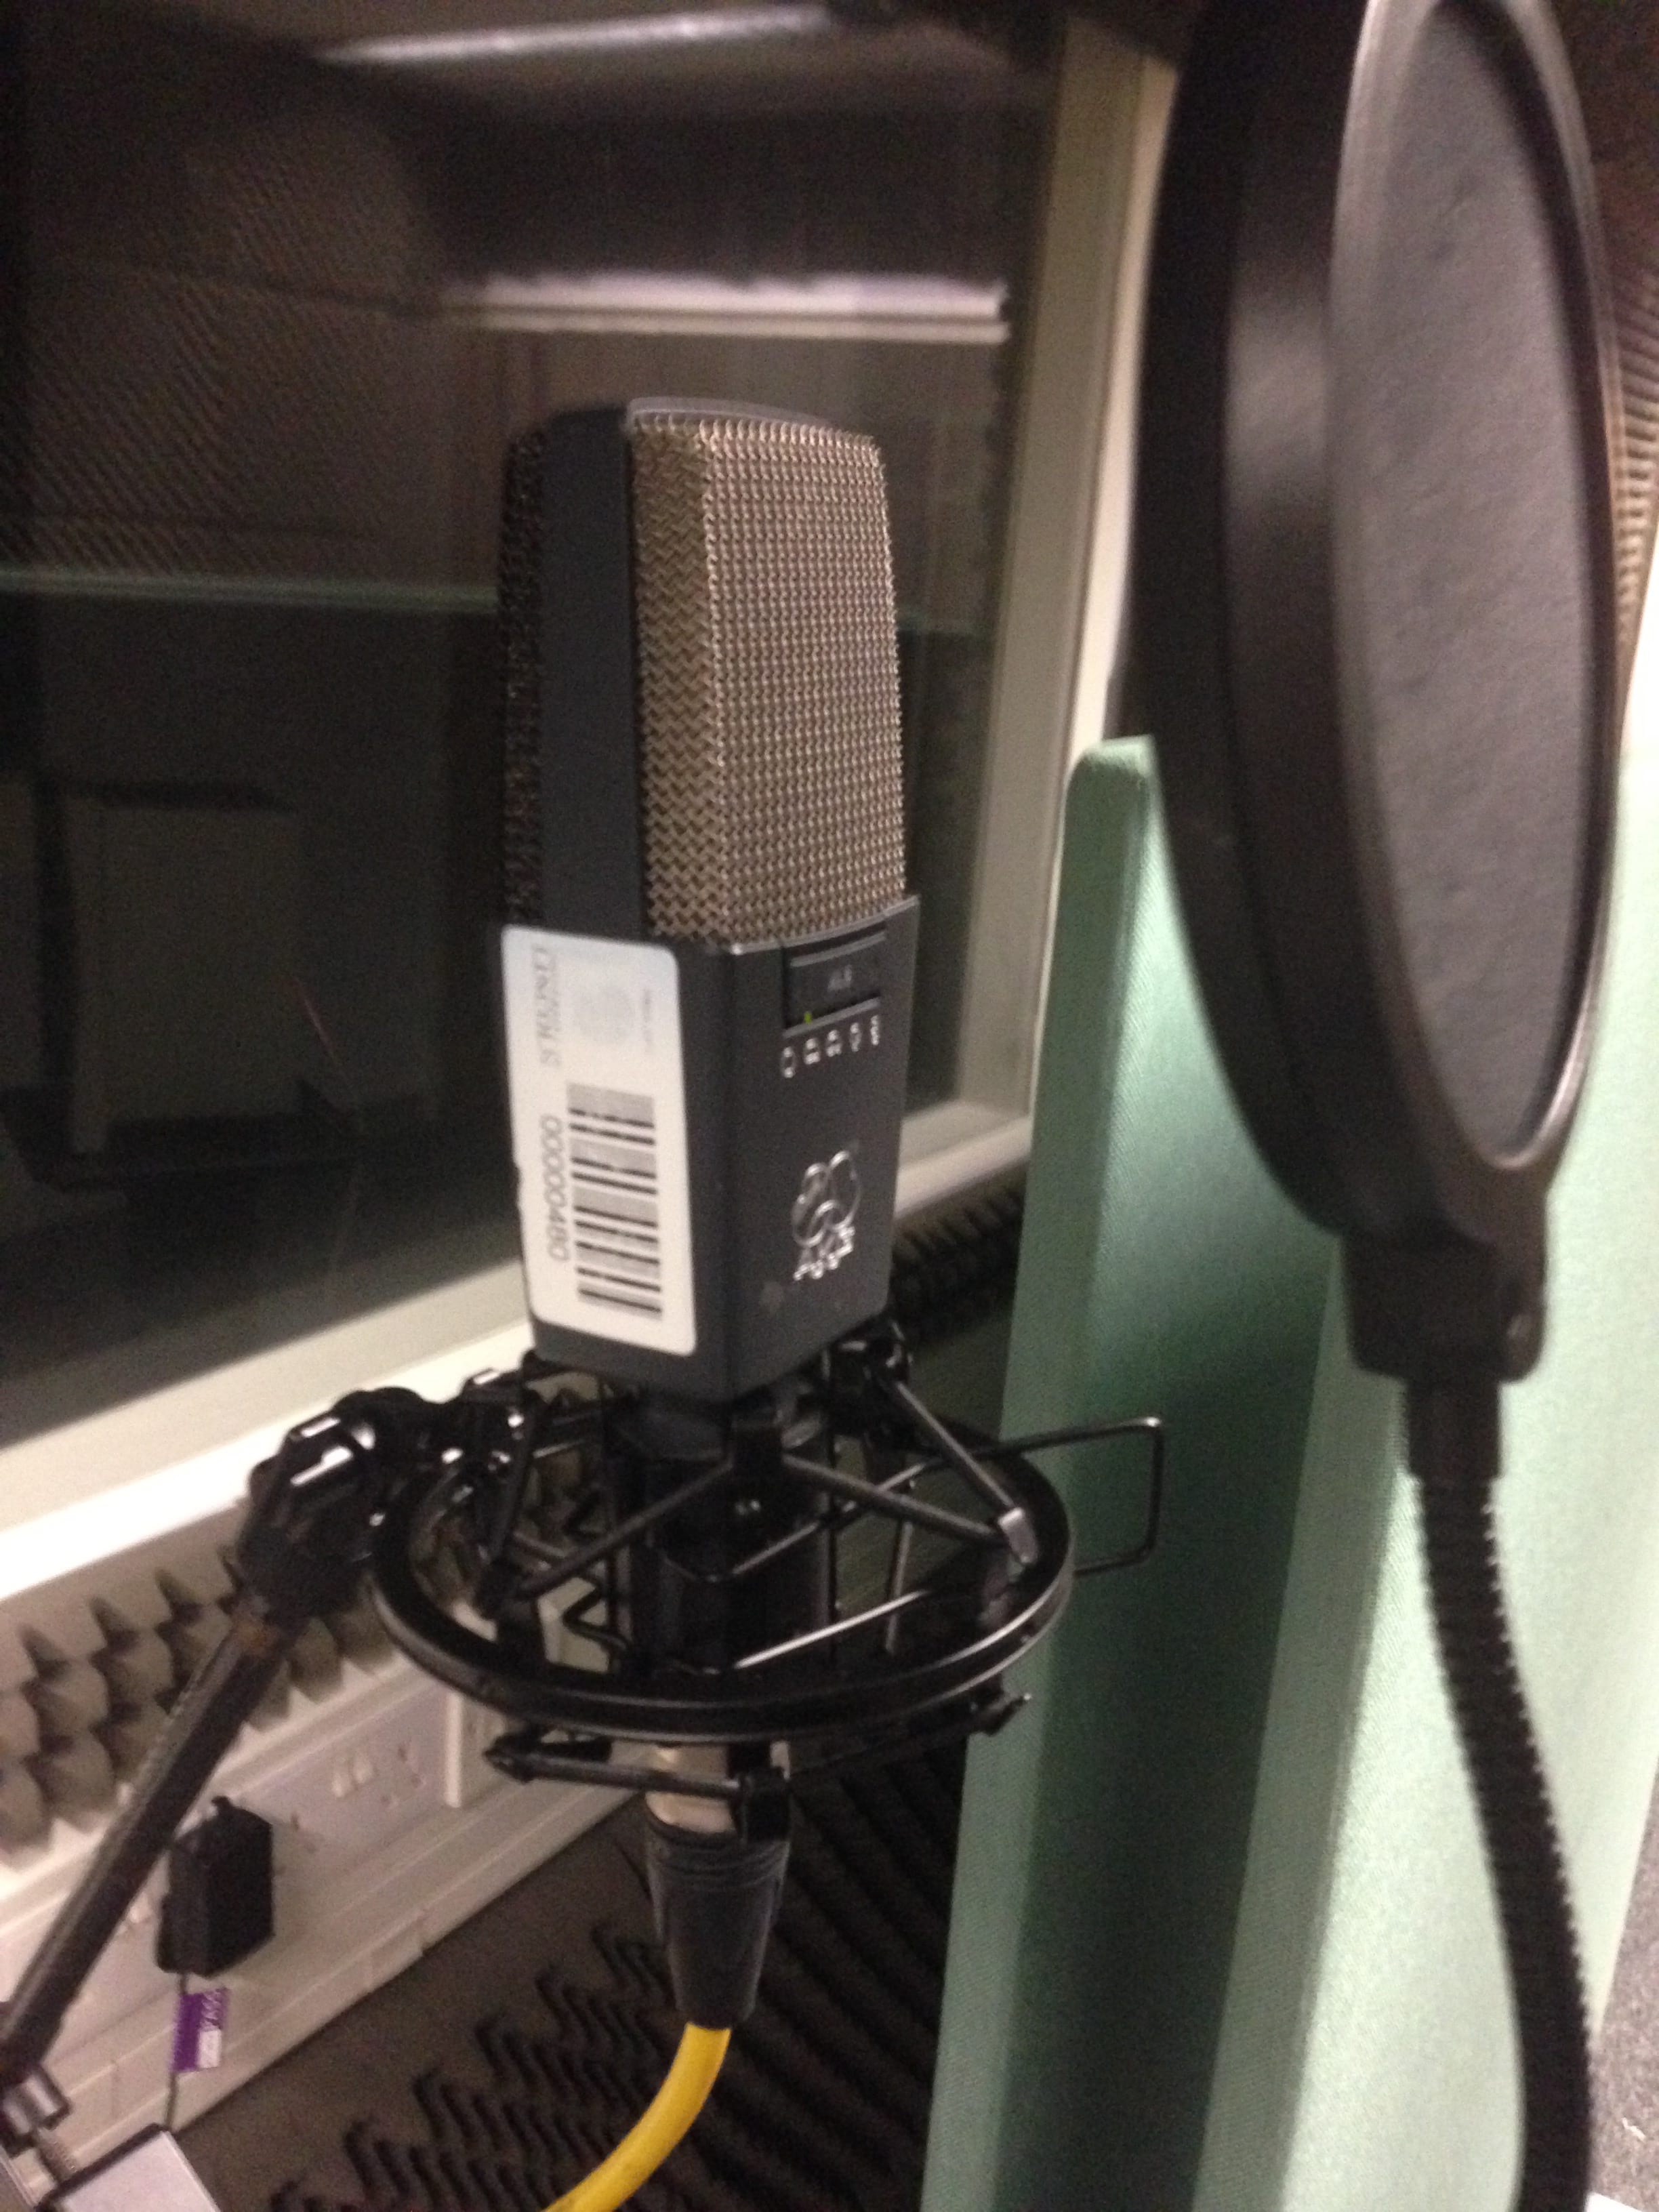
AKG C141 – A large diaphragm, mulit-patern condenser microphone with five different polar patterns (Omnidirectional, Cardioid, Wide Cardioid, Hyper Cardioid and Figure of Eight). Ideal for recording most instruments and situations due to it’s switchable features. Relatively flat frequency response when set to the Cardioid polar pattern. Little proximity effect. Optional pad switch with three settings (-6dB, -12dB and -18dB) and a High Pass Filter switch with three options (-12 dB/octave at 40 Hz, -12 dB/octave at 80 Hz and -6dB/octave at 160 Hz).
Frequency Response Chart – AKG C414 (Cardioid)
When we listened back to the three microphones we soon found out that each microphone changed the sound of the vocals in different ways. The Shure SM57 offered clarity however there was a lot of sibilance on the ‘S’ sounds. The AKG C414 set to the cardioid polar pattern and with the high pass filter on (-6dB/octave at 160 Hz) had a good sound however it was more dry than the others, picking up more plosive and breath sounds. The Electro-Voice RE20 with the high pass filter on (-2.25dB/oct at 400Hz) had a smooth, clear sound that was ideal for both the vocalist and the track.
Once we all had decided that the EV RE20 was the best mic to use, we positioned the vocalist in the dead room ready to record. During the sound check we decided to that the sound was a bit bass heavy so we added a low end shelf on the EQ on the desk around 100Hz.
We recorded the track all the way through, listened back to it and re-recorded the parts that we went happy using the playlist feature on ProTools. Using markers to mark points was useful in distinguishing the different parts of the song and parts we wanted to re-record.
Microphone List and Channel Guide
Ch. 1 – Vocals 1: Shure SM57
Ch. 2 – Vocals 2: Electro-Voice RE20
Ch. 3 – Vocals 3: AKG C414
Shure SM57Electro-Voice RE20AKG C414Testing Microphones to use on the track